Embark on a journey into the world of hardie siding installation, where durability meets aesthetics, and homeowners find their perfect exterior solution. This guide is your key to unlocking the secrets of Hardie siding, from its unmatched benefits to the step-by-step installation process.
Whether you’re a seasoned DIY enthusiast or a first-time homeowner looking to revamp your exterior, this guide will equip you with the knowledge needed to tackle hardie siding installation like a pro.
Overview of Hardie Siding Installation
Hardie siding, also known as fiber cement siding, is a popular choice among homeowners due to its durability and low maintenance requirements. Made from a mixture of cement, sand, and cellulose fibers, Hardie siding is resistant to rot, pests, and fire, making it a long-lasting option for exterior cladding.
Benefits of Hardie Siding
- Excellent durability compared to traditional wood or vinyl siding
- Resistant to moisture, rot, and pests
- Fire-resistant properties for added safety
- Low maintenance requirements, reducing long-term costs
Popularity Among Homeowners
- Wide range of styles and colors to suit different architectural designs
- Enhances curb appeal and increases property value
- Longevity ensures a lasting investment for homeowners
Durability and Longevity
Fiber cement siding like Hardie is known for its exceptional durability, able to withstand harsh weather conditions and resist fading or warping over time. Compared to other siding materials, Hardie siding is considered a cost-effective choice in the long run due to its longevity and minimal maintenance requirements.
Pre-Installation Preparation
Before beginning the Hardie siding installation process, it is crucial to ensure that you have all the necessary tools and materials ready. Proper preparation of the exterior wall is also essential to ensure a successful installation. Additionally, taking specific safety measures before starting the installation is imperative to avoid any accidents or injuries.
Necessary Tools and Materials
- Hardie siding panels
- Galvanized nails or screws
- Tape measure
- Circular saw or snips
- Level
- Hammer or nail gun
- Safety glasses and gloves
- Caulk and caulking gun
- Primer and paint
Preparing the Exterior Wall
Before installing Hardie siding, it is important to inspect and prepare the exterior wall properly. This involves checking for any damage, rot, or mold that needs to be addressed before proceeding with the installation. Repair any issues and ensure that the wall is clean, dry, and free of debris to provide a suitable surface for the siding to be installed.
Safety Measures
- Wear appropriate safety gear, including safety glasses and gloves to protect yourself during the installation process.
- Use caution when handling sharp tools and equipment to prevent any accidents or injuries.
- Work with a partner or have someone nearby in case of an emergency.
- Avoid working in wet or windy conditions to ensure a safe working environment.
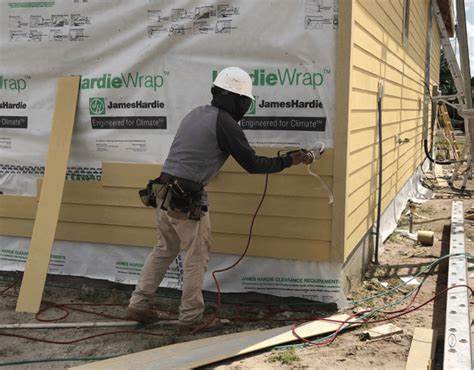
Installation Process
Installing Hardie siding requires careful attention to detail and precision. Here is a step-by-step guide on how to install Hardie siding and ensure a professional finish.
Cutting and Fitting Hardie Siding Panels
When it comes to cutting and fitting Hardie siding panels, there are a few techniques you can use to achieve a precise fit.
- Measure twice, cut once: Before cutting any panels, ensure accurate measurements to avoid wastage.
- Score and snap: Use a carbide-tipped scoring knife to score the panel along the cut line, then snap it along the scored line for a clean cut.
- Power saw: For more intricate cuts, a power saw with a fiber cement blade can be used to cut the panels with ease.
Securing Hardie Siding to the Exterior Wall
Properly securing Hardie siding to the exterior wall is crucial to ensure durability and longevity of the installation.
- Start at the bottom: Begin by installing the first course of siding at the bottom of the wall, ensuring it is level and properly aligned.
- Use the right fasteners: Hardie siding should be secured using corrosion-resistant nails or screws to prevent rust and ensure a secure attachment.
- Leave room for expansion: Allow for expansion and contraction of the siding by leaving a small gap between the panels and trim pieces.
- Overlap joints: When installing subsequent courses of siding, make sure to overlap the joints to prevent water infiltration and ensure a watertight seal.
Finishing Touches and Maintenance
When it comes to Hardie siding, the finishing touches can greatly enhance the overall look of your home. Additionally, proper maintenance is essential to ensure the longevity and durability of your siding. Let’s explore the various finishing options available for Hardie siding and some tips on how to maintain and care for it post-installation.
Finishing Options for Hardie Siding
- Painting: Hardie siding can be painted in a wide variety of colors to suit your home’s aesthetic. Make sure to use high-quality exterior paint for best results.
- Staining: If you prefer a more natural look, staining is a great option for Hardie siding. It can enhance the texture of the siding while providing protection.
- Texturing: Adding texture to your Hardie siding can create a unique and visually appealing finish. Options include smooth, wood grain, or cedar texture.
Maintenance Tips for Hardie Siding
- Regular Cleaning: To maintain the appearance of your Hardie siding, clean it periodically with a mild detergent and water to remove dirt and debris.
- Inspect for Damage: Keep an eye out for any signs of damage such as cracks, chips, or moisture build-up. Addressing these issues promptly can prevent further damage.
- Seal Joints: Ensure that the joints between the siding panels are properly sealed to prevent water infiltration and potential water damage.
Common Issues and Repairs for Hardie Siding
- Moisture Damage: If you notice any signs of moisture damage such as rot or mold, it’s crucial to address the issue immediately to prevent further damage.
- Cracks and Chips: Small cracks or chips in the siding can be repaired using a patching compound specifically designed for Hardie siding.
- Paint Peeling: If the paint on your Hardie siding starts to peel, it may need to be scraped off and repainted to maintain the appearance and protection of the siding.
Ending Remarks
As we conclude our exploration of hardie siding installation, remember that with the right tools and techniques, you can transform your home with this durable and stylish siding option. From preparation to finishing touches, mastering hardie siding installation is within your reach.
Top FAQs
What makes Hardie siding stand out from other materials?
Hardie siding is renowned for its durability, resistance to elements, and low maintenance requirements, making it a top choice for homeowners.
Do I need specialized tools for Hardie siding installation?
While some tools are specific to Hardie siding, many can be found in a standard toolkit. However, it’s important to have tools like a circular saw with a diamond-tipped blade for cutting Hardie panels.
How can I maintain Hardie siding after installation?
Regular cleaning with a mild detergent and water, along with inspections for any damage, can help maintain the appearance and longevity of Hardie siding.
